Animated Shimmering Metal Text Effect
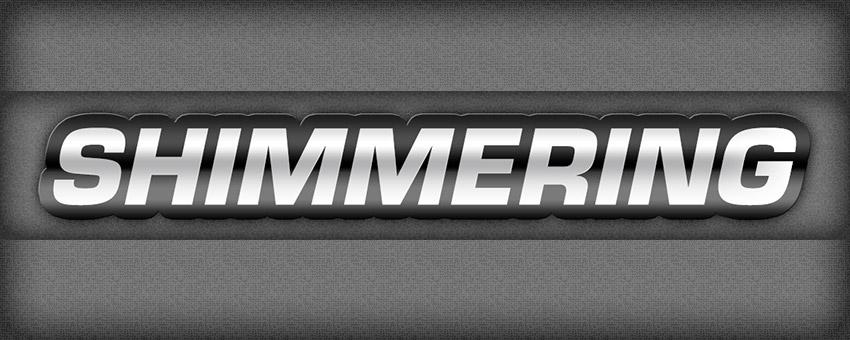
The animation tools within Photoshop are often overlooked. They may not be as powerful as dedicated animation software suites, but there are a few tricks that you can pick up to give your web graphics a little more flare.
In this tutorial you will learn how to use layer styles and the animation timeline within Photoshop to create an animated shimmering metal text effect.
What You Will Be Making
The text will shimmer every couple of seconds.

Step 1
Create a new document that is 570 x 100. Fill the background with a medium gray color and use the Type Tool to create some white text.

Step 2
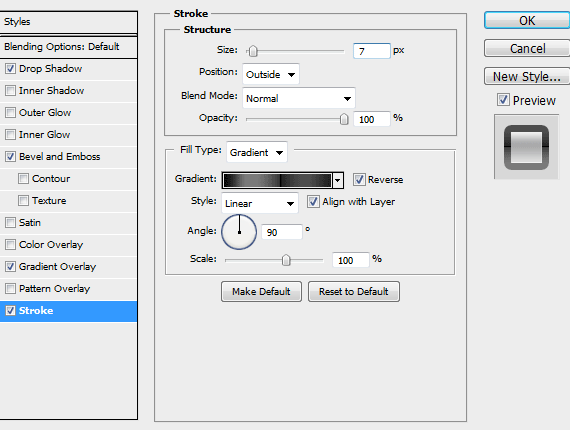
Double click the layer name in the Layers palette or right click on the layer name in the Layers palette and select Blending Options to open the Layer Style dialog box.
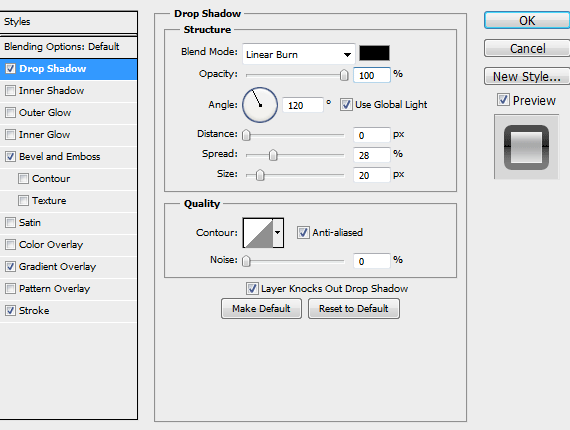
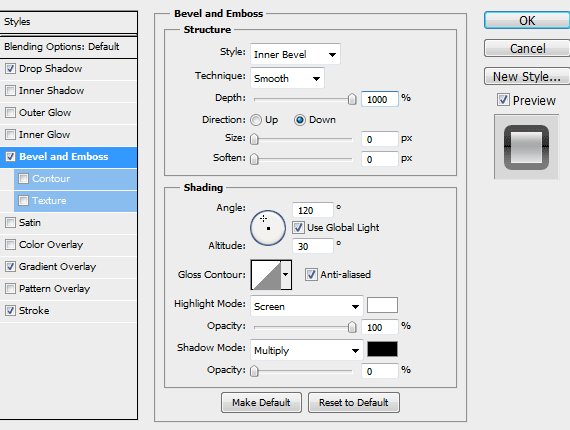
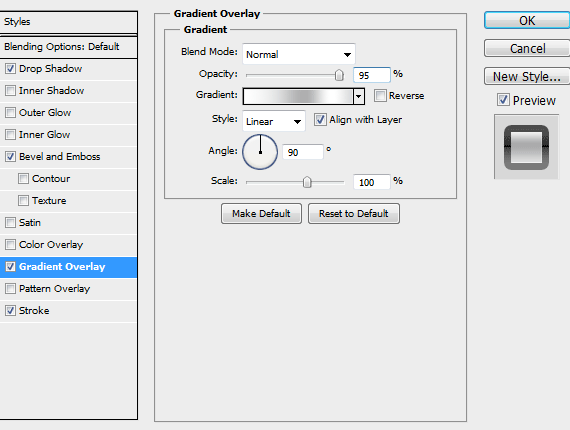
Apply the following settings to the layer Blending Options to give it a metallic look.

Step 3
Duplicate the text layer by right clicking the layer in the Layers palette and selecting Duplicate Layer. Right click the layer name in the Layers palette and select Clear Layer Styles.
Change the text to black and apply the following settings to the layer Blending Options to give the text a thick black stroke. Right click the layer name in the Layers palette and select Convert to Smart Object.
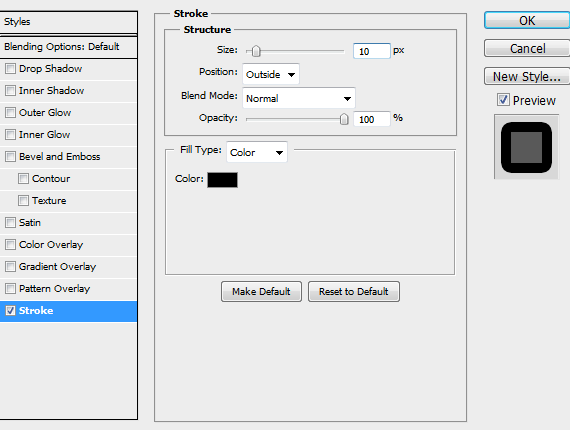
If you hide the other text layer, your file should look like this.

Step 4
Duplicate the text layer by right clicking the layer in the Layers palette and selecting Duplicate Layer. Right click the layer name in the Layers palette and select Clear Layer Styles.
Change the Fill opacity for the new text layer to 0% at the top of the Layers palette and apply the following settings to the layer Blending Options.
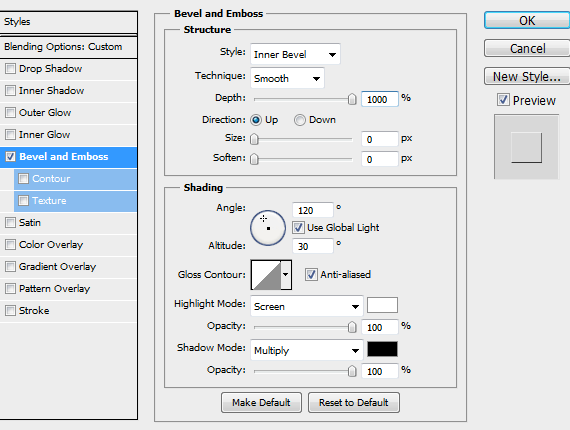
Unhide the other text layer. Your image should now look like this.

Step 5
This part is where it can get a little tricky so read carefully. We are going to create a series of layers that we will then animate to become the shimmer effect.
Duplicate the first text layer you created and move it above all of the other layers by dragging it in the Layers palette or pressing CTRL + ].
Right click the layer name in the Layers palette and select Clear Layer Styles, and then change the Fill opacity to 0% in the layers palette.
Now apply the following settings to the layer Blending Options.
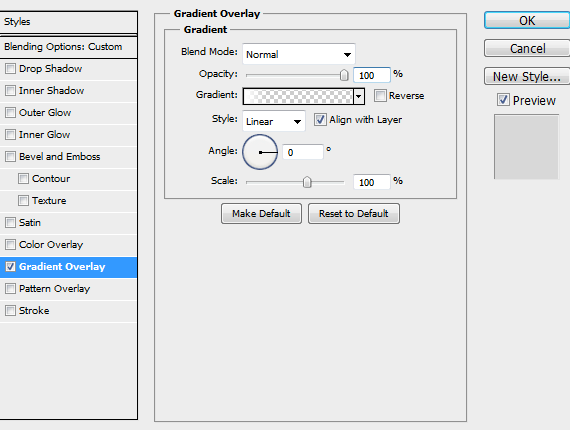
Use gradient settings similar to the ones below. The first stops have the following settings: Location: 0%, Opacity: 100%. The second stops have the following settings: Location: 10%, Opacity: 0%.
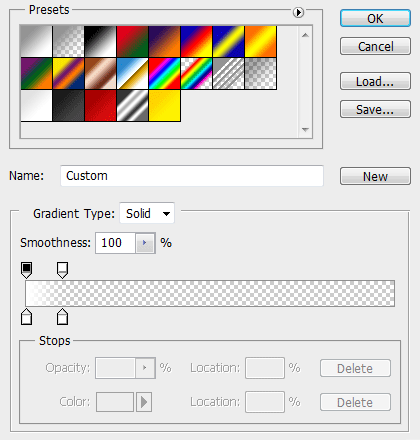
If you hide all the other text layers, your image should look like this.

Step 6
Duplicate the shimmer layer, hide the original shimmer layer, and then rename the new layer to "Shimmer 2".
Apply the following changes to the gradient within the layer Blending Options.
The first stops have the following settings: Location: 10%, Opacity: 0%. The second stops have the following settings: Location 20%, Opacity: 100%. The third stops have the following settings: Location 30%, Opacity: 0%.

Step 7
Repeat these steps to create a total of 6 shimmer layers. The middle stops in each gradient should move 20% further over each time.
Step 8
Open the Animation palette by clicking Window > Animation. If your Animation palette is showing up in Timeline view rather than Frame view, click the icon in the bottom right corner of the Animation palette window.
Hide all of the shimmer layers we created in steps 6 and 7.
Set the duration of frame 1 to 2 seconds and make sure to select "Forever" just under frame 1 to make sure the animation will loop continually when you are done.

Step 9
Create a new frame in the Animation palette and unhide the first shimmer layer.Set the duration of frame 2 to .05 seconds.

Step 10
Create a new frame in the Animation palette, hide the first shimmer layer, and unhide the second shimmer layer. Set the duration of frame 3 to .05 seconds.
Repeat this process until you have a total of 7 frames with frame 1 showing just the main text and no shimmer layers.
Press the Play Animation button to preview the animation.
Press CTRL + ALT + SHIFT + S to open the Save for Web dialog. Choose GIF as the file format and save the image.

Final Image
You can go back and add some effects to the background as well.
Keep in mind that you may have to copy and paste any effects you create from the selected frame to all the other frames in the animation.


