How to Make a Glowing Planet on a Space Background in Photoshop

Watch Video Tutorial
Download full HD videos and tutorial project files with a PanoPass. You'll also get instant access to everything on the site, including products, and more.
Vintage design has been very popular recently, but sometimes you need to design for the future instead of the past.
In this tutorial you'll learn how to create a futuristic, glowing planet on top of a space background, using nothing but Photoshop filters and a single texture.
Step 1
Create a new document at 1920 x 1280 and fill the background with black.
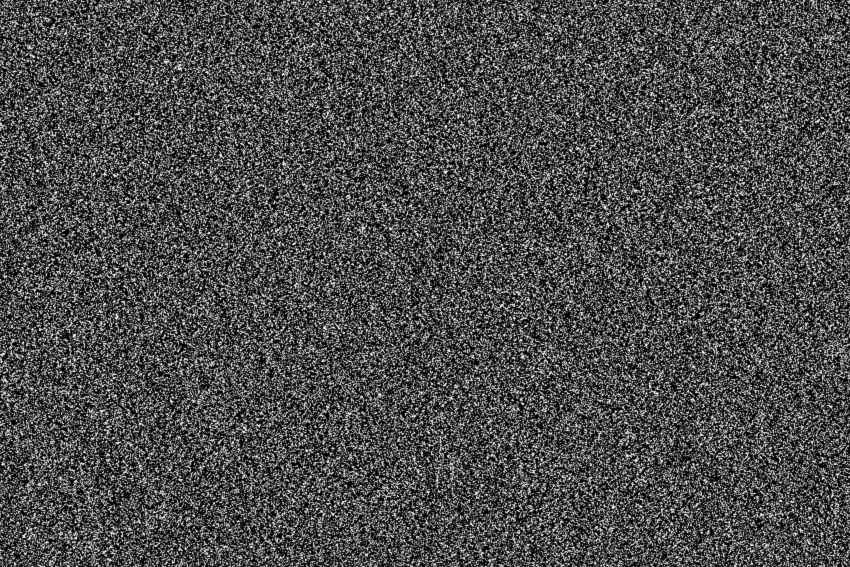
Click Filter > Noise > Add Noise. Set the amount to 85%, the distribution to Gaussian, and check the Monochromatic checkbox.
Hit OK, then click Filter > Blur > Gaussian Blur. Set the radius to 0.3 pixels and hit OK.
Step 2
Add a new Levels adjustment layer. Set the black stop to 140, the center stop to .25, and the white stop to 230 in the Properties panel.
Now we have a nice star field to work with.

Step 3
Open your texture file as a new document. The best textures to use are pretty grungy and have a lot of contrast.
Crop your canvas so that your texture is in a square format, then convert it to a Smart Object. This is important if you want to be able to easily swap out your planet texture later.
Click Filter > Distort > Spherize. Set the amount to 100% and the mode to normal and hit OK.
Press CTRL + F to apply that same filter one more time.

Step 4
Click Layer > Vector Mask > Reveal All to add a vector mask to your Smart Object.
Select the Ellipse tool with the mode set to Path in the top toolbar, create a circle that is the same size as your canvas. Center the circle within the vector mask so only the spherical "planet" is showing in your canvas.
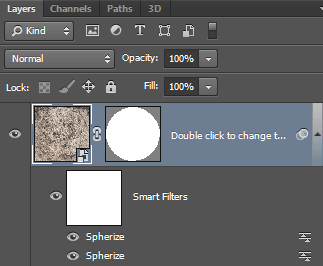
Right click your Smart Object in the Layers panel and convert that into a Smart Object (yes, Smart Objects can contain other Smart Objects).
Right click your new Smart Object and select Duplicate Layer. Under destination, select your working document and hit OK.
Step 5
Back in your working document, resize your planet to 1920 pixels wide, then center it horizontally in your document, with the bottom portion hanging off the canvas.

Step 6
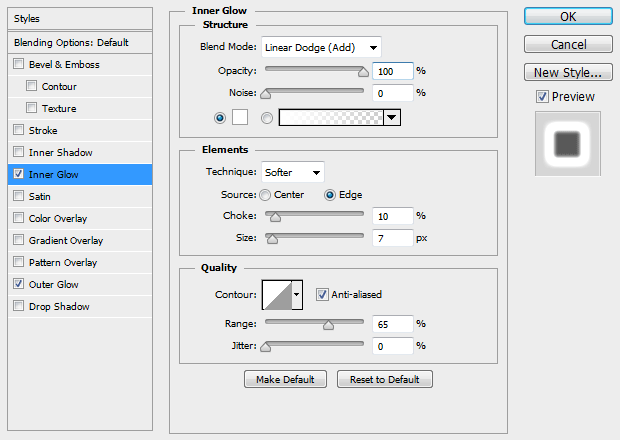
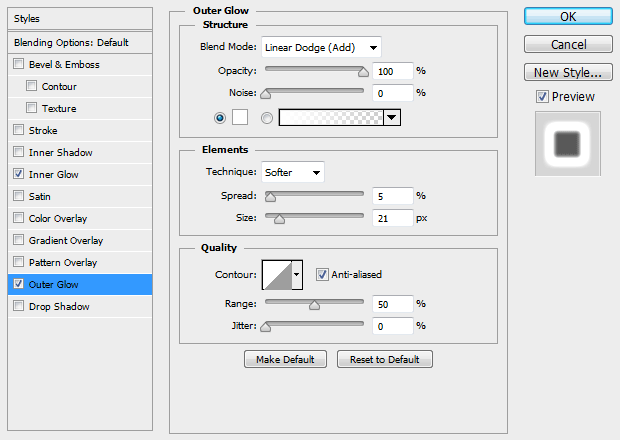
Apply the following Layer Style settings to your planet layer. We used the color #FFF8F3 for our glows, which was sampled directly from the planet.
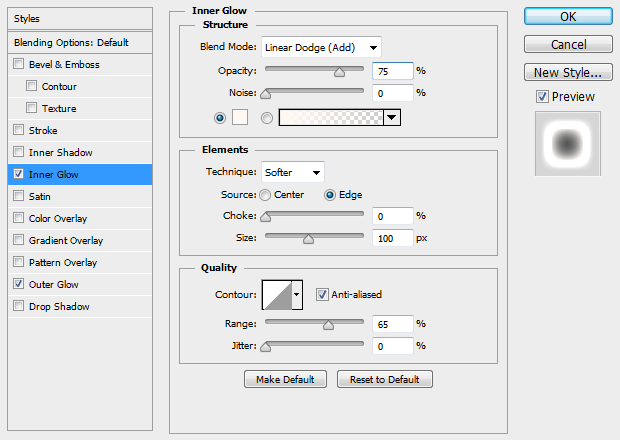
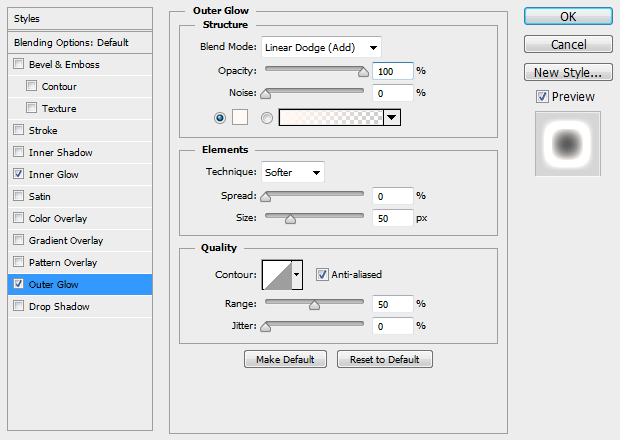

Step 7
Create a new layer and with a soft white brush at about 800px, click once just about the center point of your canvas to paint a subtle glow.
Your glow should look like the image below when placed on a black background.

Set the Blend Mode of the glow layer to Linear Dodge and the Fill to 35% in the Layers panel.
Right click the glow layer in the Layers panel and select Create Clipping Mask to mask your glow so it doesn't affect the background.

Step 8
Using the Ellipse tool with the mode set to Shape in the top toolbar, click your canvas and create an ellipse that is 1920 x 1920 pixels in size using the color #0D0805. Drag it into place directly over your planet.
Scale it up to 2250 x 2250 pixels and move it down so it's only covering the bottom portion of your planet.

Step 9
In the Properties panel, set the Feather to 65 pixels. Then, set the Blend Mode to Linear Burn in the Layer panel.

Step 10
Create a new layer and fill it with black.
Click Filter > Render > Lens Flare. Set the brightness to 100% and select Movie Prime as your lens type. Click and drag the lens flare thumbnail until it's centered just over the top of your planet and hit OK.
Set the Blend Mode for your lens flare to Screen in the Layers panel.
You may have to undo and redo this step a couple times until you're happy with the positioning of the flare.

Step 11
Repeat step 10, but this time select 105mm Prime as your lens type, and set the Opacity to 85% in the Layers panel.

Step 12
Create your title text using the color black. We're using the font Franchise.
Apply the following Layer Style settings to make it look like it's being backlit by our lens flares.

Step 13
Duplicate your title text. Move it down, resize it, and replace the text with your tagline.
Right click the effects of the tagline layer in the Layers panel and select Scale Styles. Scale the styles down to 50% and hit OK.

Step 14
Create a new layer underneath your title text. With a soft, white brush at around 80px, click behind the corners of certain letters to create individual flares.

Step 15
Create a new layer just underneath your planet layer and using a soft, white brush around 800px, click once to paint one big flare just behind your lens flares.
Set the Blend Mode for this flare to Linear Dodge in the Layers panel.

Step 16
Create another new layer just underneath your planet layer and fill it with black.
Make sure your foreground and background colors are set to black and white. It doesn't matter which is which.
Click Filter > Render > Clouds and hit OK. Click Filter > Render > Difference Clouds and hit OK. Press CTRL + F to run the Difference Clouds filter one more time.
Set the Blend Mode to Overlay and the Fill to 35% in the Layers panel.

Step 17
At the very top of your document, create a Gradient Fill adjustment layer.
Set the style to linear, the angle to -90, and the scale to 100%.
Click the gradient to edit the colors and set the left stop to #008AFF with the location at 25%. Set the right stop to #FF8C2F with the location at 35%.
Change the Blend Mode to Vivid Light and the Fill to 20% in the Layers panel.
You may need to adjust the locations a bit depending on your document. The idea is to make the flare look blue and the planet look orange.

Final Image
Since a lot of these steps use Smart Objects and Adjustment Layers, you can easily go back and tweak the settings until you're happy.
Since we used Smart Objects in steps 3 and 4, you can easily double click each Smart Object and replace your original texture to instantly update your final image.

Did you know that this was possible using nothing but Photoshop filters? Show us what you made in the comments.
Related Items
Grab a PanoPass now and get instant access to all these items and much more.


